63 people found this helpful
You’re always doing something for someone – for your job, your group chats, your roommate who’s dishes simply never stop piling up in the sink. So, when it comes to your own space? It's the last thing you think about. But a cluttered space makes for a cluttered mind. So, why not take a few quiet minutes for a (toilet roll) craft that helps you reset? This easy DIY pencil holder isn’t just about cleaning up your desk, it’s about reclaiming a bit of calm in your own space and mind.
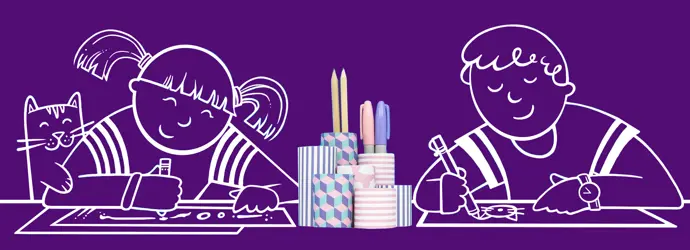
Plus, this DIY pencil holder is easy to make, and you probably already have everything you need lying around. Help reduce waste by repurposing your Cushelle toilet paper cores into a nifty DIY pencil case or pen pot that’ll let you unleash your creativity and organisation skills all in one. Now, without further ado, let’s dive into how to make pen holder pots out of empty toilet rolls with our easy-to-follow make your own pencil case or pen pot tutorial.
Takes about 1.5 hours
When working on these toilet roll crafts, we recommend leaving the cutting and hot gluing to an adult, if children are getting involved. Any little ones can take charge of the painting and decorating (i.e., the fun part).
What you’ll need
- 5 Cushelle toilet roll tubes
- Empty tissue box
- Ruler
- Pencil
- Paint
- Paintbrush
- Wrapping paper
- Scissors
- Glue
- Hot glue gun
Keep in mind: You may choose to use more or fewer toilet roll tubes, depending on how far you want to go with your toilet roll crafts. You can stick to the five tubes we recommend, or choose for yourself —whatever you prefer.
If you’re making your DIY pen holder for a budding artist, for example, you might want to up the number of tubes to store their many paintbrushes, ink pens, felt tips, pencils and more!
Do you have your materials ready? Then let’s get crafting!
How to make a DIY pencil holder:
-

Remember, the more you do, the bigger and more varied your pencil pot will be. Make sure that young children use scissors only while under adult supervision. Once you’re a seasoned pro, why not try cutting the toilet roll tubes at different angles: zig-zags, wiggly lines or turrets could make for a very funky DIY pen holder! -

-

Feel free to get creative with this step by picking out different types of wrapping paper! Is this DIY pencil case a birthday gift for someone special? Then go ahead and use birthday-themed wrapping.
Need some more pen holder ideas? You could use printed photos of your family, friends or pets. How about toilet roll craft ideas that get you into the holiday spirit every time you sit down at your desk? The possibilities are endless if you’re looking to shake up your DIY pen pot design.
-

-

-


Glue can get messy, but it’s much easier to clean up if you give it a wipe when it’s still wet. Keep a wet wipe on hand so you can wipe up as you go.
Now that you’ve mastered how to make your own pencil case or pen pot, take a step back and admire what you’ve done. Not only do you have a tidy desk, but you also indulged in creative little win to break away from the stress of a typically busy day. You took some time to declutter your space for yourself, just as you deserve.
Did you find this article helpful?Thanks for your feedback!
or
Related articles
How to make puppets for kids: 10 easy steps for the best toilet roll puppets
This easy tutorial shows you how to make a puppet with string, paint and toilet rolls. Puppet making for kids is simple with these DIY toilet roll puppets.

2 Creative Kids' Birthday Decoration Ideas
Learn how to make homemade party decorations with bunting and piñata DIY birthday decoration tutorials. Click here for these party decoration ideas for kids.

Smart and Crafty Activities for 5-Year-Olds
Learn how to make binoculars and a watch out of household objects in these two tutorials that are the perfect rainy-day activities for 5-year-olds.

2 scarily simple Halloween crafts for kids
Looking for Halloween craft ideas for children? Read this step-by-step guide on how to make spooky spiders and a haunted house.

2 Easy Easter Crafts for Kids
Want to know how to fold a paper napkin? Look no further. Folding paper napkins is easy, even for kids, with our guides to folding paper napkin lotuses and cutlery cones.

How to Make Paper Flowers
Follow our simple paper-flower-making tutorial to learn how to make paper flowers at home. Click here to discover how to make a paper flower.