73 people found this helpful
Springtime conjures up visions of bunnies with soft tails and chicks with fluffy feathers, so what better way to celebrate the season than with Easter crafts for kids that involve making those very things? Bring the freshness of spring into your home with these fun Easter craft ideas using soft Cushelle tissues and empty tissue boxes.
Ready to get going on your Easter crafts? Read on for tutorials on two fun Easter craft ideas for kids.
We recommend that a responsible adult does the cutting for these Easter crafts and any little assistants take care of the painting and gluing.
Finger puppet Easter crafts
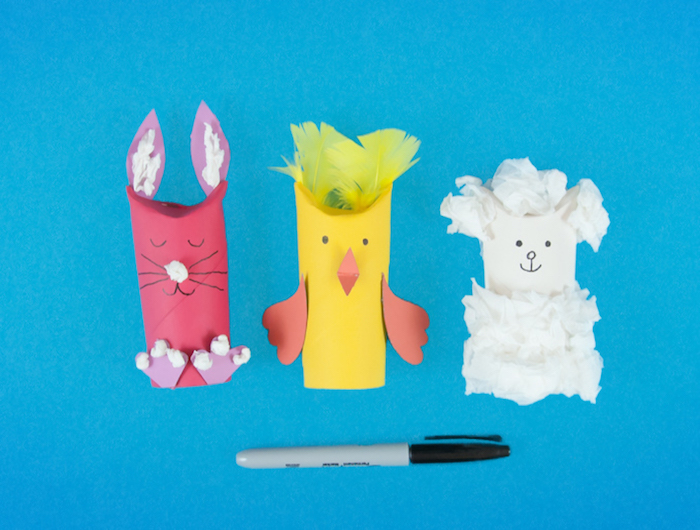
Turn empty Cushelle tissue boxes into our fun finger puppets, making perfect Easter craft activities for kids on rainy days over the Easter holidays
Takes about 2 hours
What you’ll need
- Empty Cushelle toilet roll tubes
- Empty Cushelle facial tissue box
- Cushelle soft facial tissues
- Paint
- Paint brush
- Pencil
- Scissors
- Glue
- Feathers
- Black pen
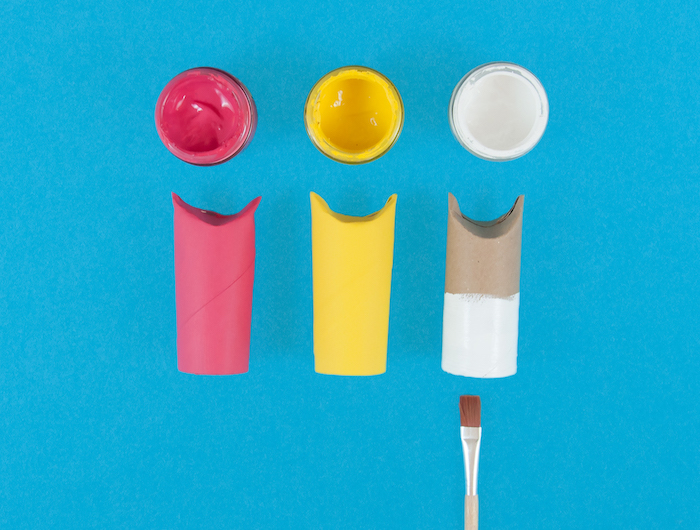
![easter crafts finger puppets 01]() First, press down the sides of one end of each of the empty toilet rolls with your fingers.
First, press down the sides of one end of each of the empty toilet rolls with your fingers.![easter crafts finger puppets 02]() Then paint each toilet roll in a different colour – pink for the bunny, yellow for the chick and white for the lamb – and leave to dry.
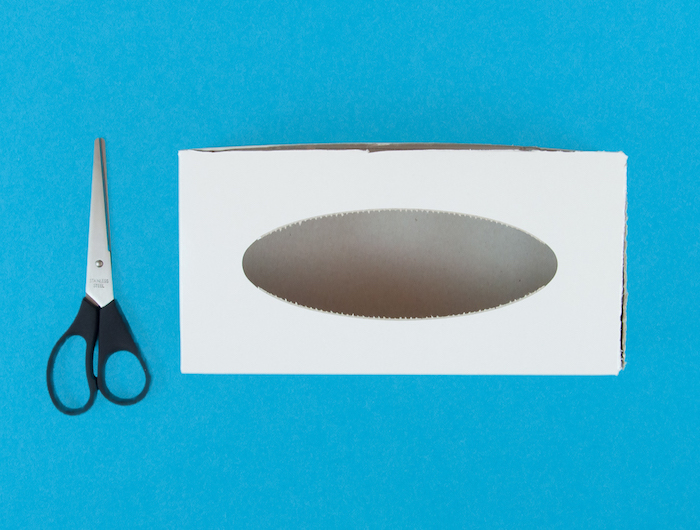
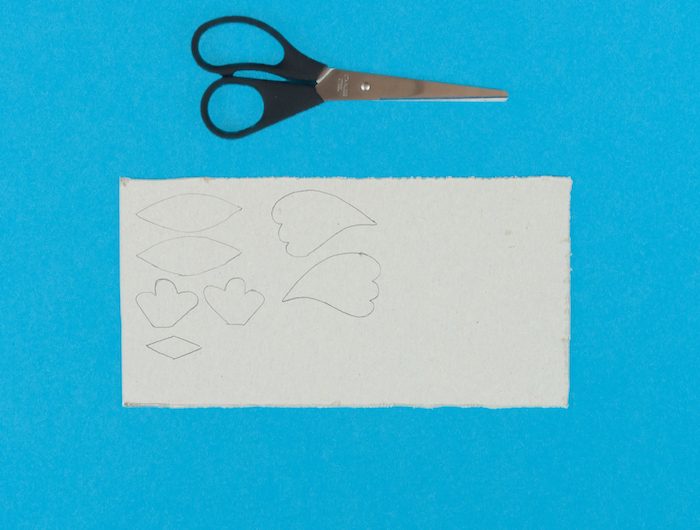
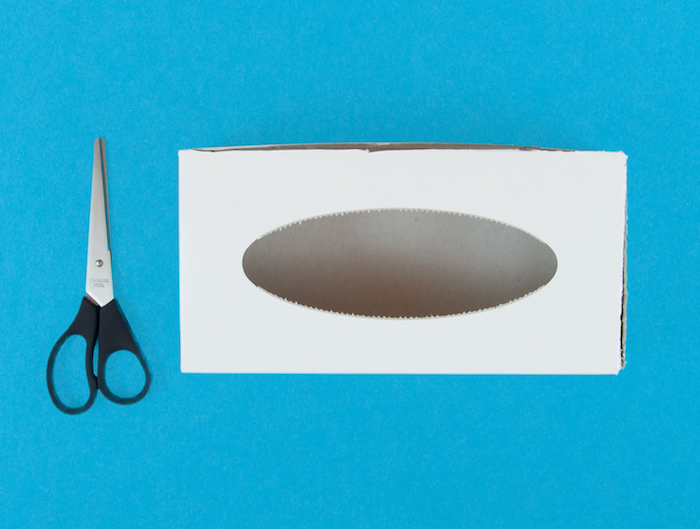
Then paint each toilet roll in a different colour – pink for the bunny, yellow for the chick and white for the lamb – and leave to dry.![easter crafts finger puppets 03]() Next, cut open and flatten the empty tissue box with scissors.
Next, cut open and flatten the empty tissue box with scissors.![easter crafts finger puppets 04]() Draw some bunny ears, paws, chick’s wings and a beak on the cardboard and cut out.
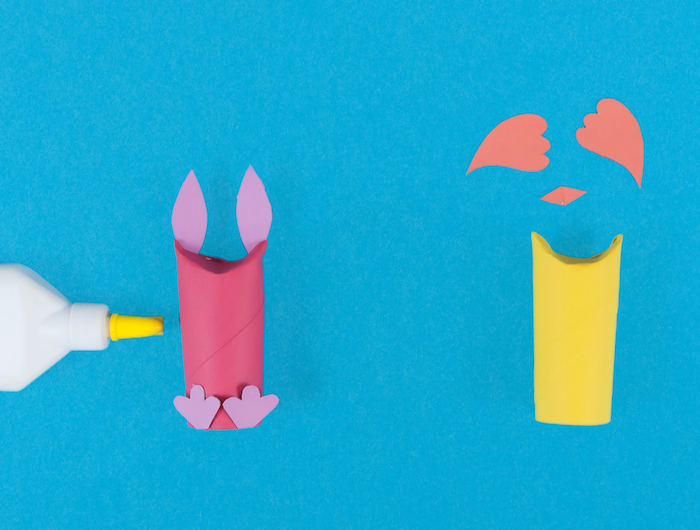
Draw some bunny ears, paws, chick’s wings and a beak on the cardboard and cut out.![easter crafts finger puppets 05]() Now paint the different body parts and leave them to dry before sticking them to the painted toilet rolls.
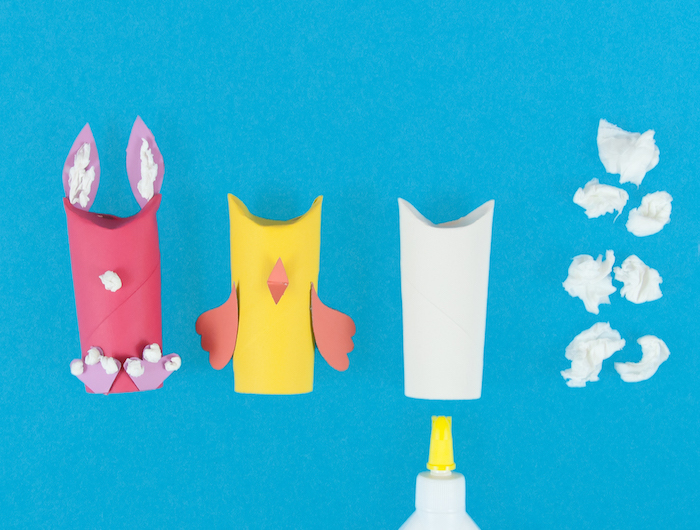
Now paint the different body parts and leave them to dry before sticking them to the painted toilet rolls.![easter crafts finger puppets 06]() Next, tear up some soft Cushelle facial tissues and scrunch into small balls for the bunny’s paws, and large balls for the lamb’s ears, hair and body. Stick them in place with glue.
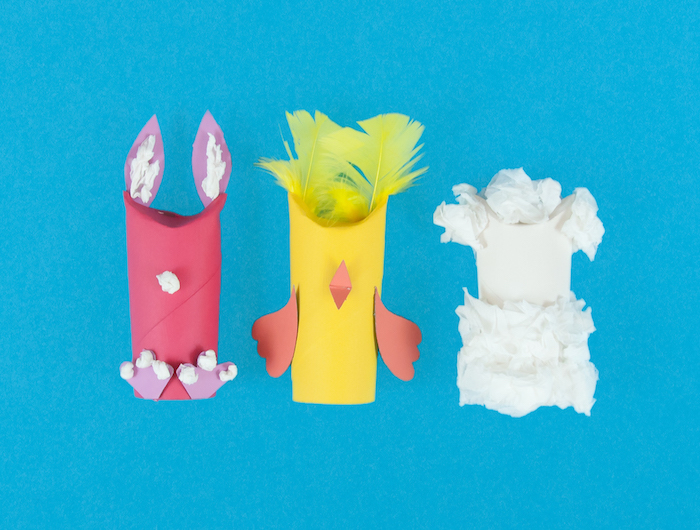
Next, tear up some soft Cushelle facial tissues and scrunch into small balls for the bunny’s paws, and large balls for the lamb’s ears, hair and body. Stick them in place with glue.![easter crafts finger puppets 07]() Add some yellow feathers to the chick’s head with glue.
Add some yellow feathers to the chick’s head with glue.![easter crafts finger puppets 08]() Finally, use a black pen to add the facial features to the finger puppets.
Finally, use a black pen to add the facial features to the finger puppets.

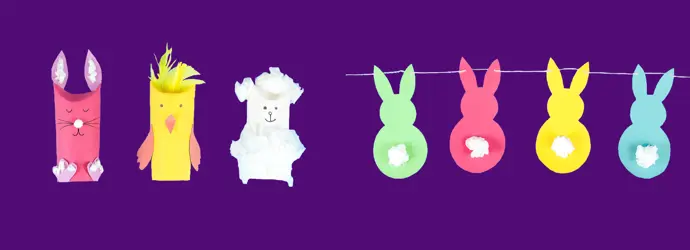
Easter crafts: bunny garland
Our super cute bunny garland complete with soft Cushelle tissue tails is really easy and fun to make with the kids this spring. This is one of those easy Easter crafts for toddlers who love to paint.
What you’ll need
- Empty Cushelle facial tissue boxes
- Soft Cushelle facial tissues
- Bunny template
- Pencil
- Scissors
- Paint
- Paint brush
- Glue
- Needle or bradawl
- String
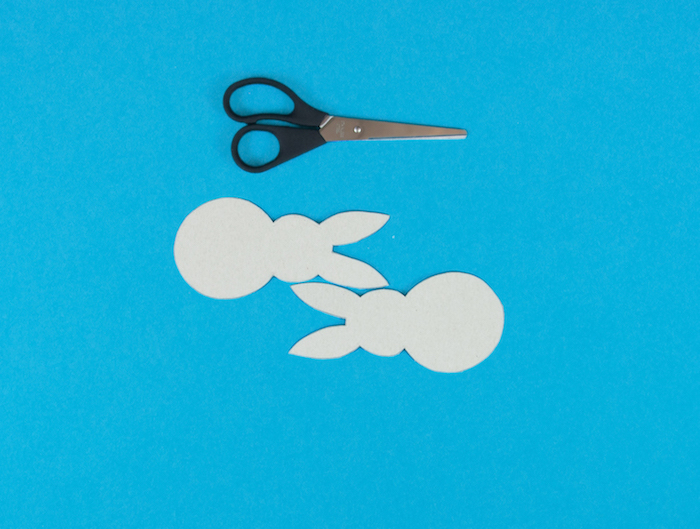
![easter crafts bunny garland 01]() Carefully cut open and flatten the empty tissue boxes. Print the bunny template on paper and cut out. Then use the template to draw and cut out 10 cardboard bunnies.
Carefully cut open and flatten the empty tissue boxes. Print the bunny template on paper and cut out. Then use the template to draw and cut out 10 cardboard bunnies.![easter crafts bunny garland 02]() Use the template to draw and cut out cardboard bunny shapes.
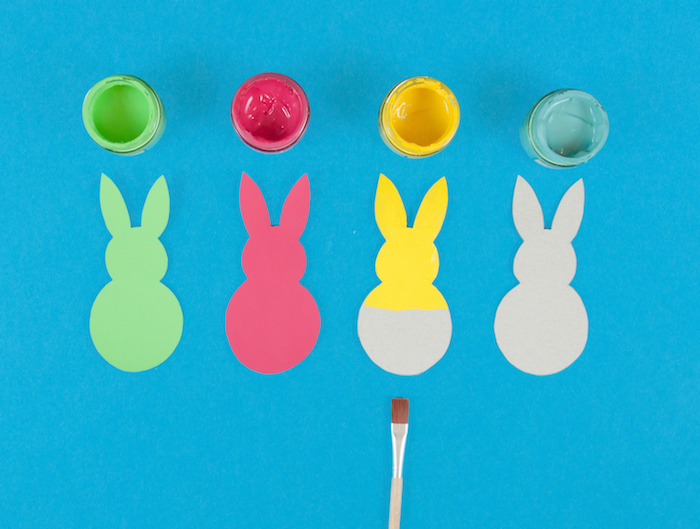
Use the template to draw and cut out cardboard bunny shapes.![easter crafts bunny garland 03]() Paint the bunnies in different colours, and leave to dry.
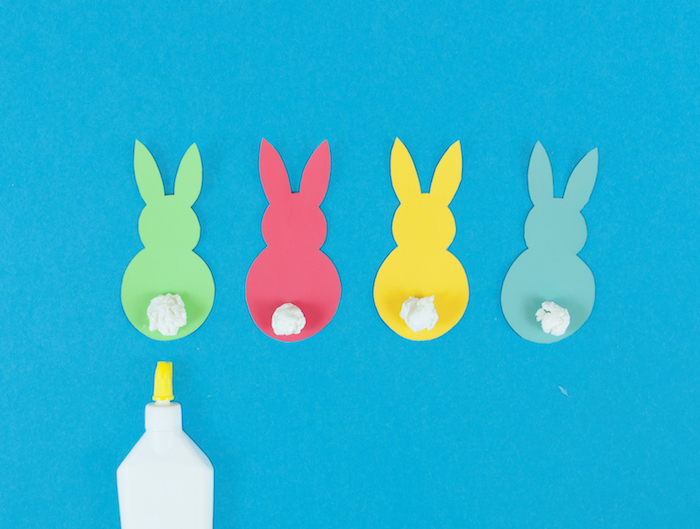
Paint the bunnies in different colours, and leave to dry.![easter crafts bunny garland 04]() Tear and scrunch the soft tissue into small balls and glue to the bunnies’ bottoms. This is a great opportunity to have a giggle with your little ones!
Tear and scrunch the soft tissue into small balls and glue to the bunnies’ bottoms. This is a great opportunity to have a giggle with your little ones!![easter crafts bunny garland 05]() Make a small hole in each ear of the painted bunnies. Then thread the string through each of the bunnies one by one.
Make a small hole in each ear of the painted bunnies. Then thread the string through each of the bunnies one by one.
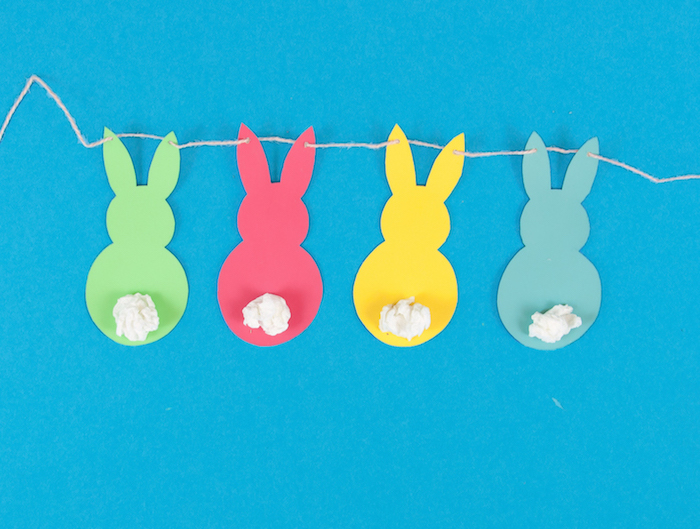
And there you have it, a beautiful bunny garland to brighten up your home during the spring… and summer… and autumn – the kids won’t want to take it down. A bunny’s not just for Easter after all!
Now that you’ve got a couple of Easter art and craft ideas, all you need to do is gather up your supplies (and kids!) and get crafting. Enjoy!
Did you find this article helpful?Thanks for your feedback!
or
Related articles
2 Mother’s Day Craft Ideas She’ll Keep Forever
Follow two easy Mother's Day craft tutorials to learn how to make a dressing table tidy and 3D heart canvas. Click here for Mother's Day craft ideas for toddlers.

Fast and easy Christmas craft ideas to decorate your tree
Get into the festive spirit with these amazing Christmas crafts! From loo roll Santa to a glitzy Christmas tree, find something your kids will love here.

How to make puppets for kids: 10 easy steps for the best toilet roll puppets
This easy tutorial shows you how to make a puppet with string, paint and toilet rolls. Puppet making for kids is simple with these DIY toilet roll puppets.

2 Creative Kids' Birthday Decoration Ideas
Learn how to make homemade party decorations with bunting and piñata DIY birthday decoration tutorials. Click here for these party decoration ideas for kids.

2 scarily simple Halloween crafts for kids
Looking for Halloween craft ideas for children? Read this step-by-step guide on how to make spooky spiders and a haunted house.

2 Easy Pom Pom Crafts: Making pom poms with wool
Learn how to make pom poms with cardboard and wool using empty toilet rolls and empty boxes. Making pom poms with recycled materials is easy when you know how!