Christmas is a time for family, a time for friends, and a time for… Christmas card design ideas for kids, of course! Craft cards for Christmas are a perfect festive activity to enjoy together, and they make beautiful gifts in their own right. Below, we have two easy Christmas card ideas for kids to make that destined to make your Christmas card list more popular than Santa’s.
How to make a Christmas card: Fluffy reindeer
Christmas isn’t Christmas without a festive reindeer – or eight! Kids will enjoy sticking on fluffy toilet paper ‘fur’ and funny features with these easy Christmas cards for kids to make.
Takes about 1 hour
What you’ll need
- 2 empty Zewa Cushelle tissue boxes
- Cushelle toilet paper
- Scissors
- Triangle template
- Pencil
- Paint brush
- White paint
- Ruler
- Purple paper
- Glue
- Colouring pens
- Silver glitter (ideally plastic-free if you can find it)
- First step on this Christmas card that kids can make: let’s make our fluffy reindeer’s body. Cut open the empty tissue boxes and remove the sides.
- Draw around the triangle template on one of the pieces and cut out.
- Paint both sides white and leave to dry. Then, fold the top section over to form the reindeer’s head.
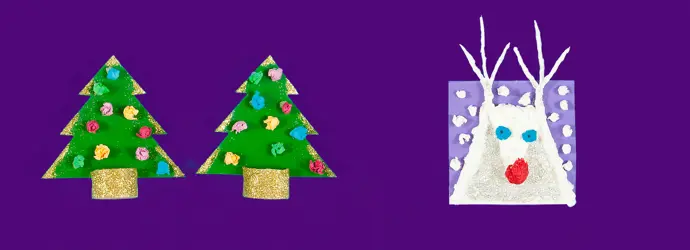
- Next, tear the Cushelle toilet paper into pieces and scrunch into balls for the eyes, nose, and snow, saving some of the strips to scrunch for fur.
- Then, take some more sheets of toilet paper, and tear and twizzle strips together for your reindeer antlers. Choose a toilet paper that’s strong enough to withstand some twizzling, like Cushelle!
- To make the base for your Christmas card craft, cover the second piece of card with purple paper and fold in half.
- Finally, glue your white reindeer head to the card, followed by the eyes and nose – add some colour with pens. Stick the fluffy fur, antlers and snow in place, and finish with a generous sprinkling of glitter.
There you have it – you’ve finished your first DIY card; Christmas has officially started! By our calculations, Santa has at least eight fluffy reindeers… so stock up on those tissue boxes to finish your Christmas card craft.
How to make a Christmas card: 3D Christmas tree
A glittery base and colourful baubles make this 3D Christmas tree card really stand out. Follow these simple steps to make a Christmas card that looks like a decoration in its own right.
Takes about 2 hours
What you’ll need
- Empty tissue boxes
- Cushelle toilet paper
- Toilet roll tube
- Scissors
- Tree template
- Pencil
- Paint brush
- Green paint
- Food colours
- Bowl
- Water
- Glue
- Gold glitter (ideally plastic-free, if you can find it)
- First step to this easy Christmas card for kids to make: Cut open the Empty tissue boxes and remove the sides. Draw around the tree template and cut out. Paint both sides green and leave to dry.
- Next, mix some drops of food colour with water in a bowl, and submerge a sheet of Cushelle toilet paper in the solution. Remove, and allow to dry somewhere warm on some newspaper.
- Repeat to create different coloured sheets.
- Now, cut and scrunch the dyed tissue into small ‘baubles’, and glue to one side of the painted card tree – leave the reverse plain to write a festive greeting.
- Next, take the toilet roll tube and cut a 2.5cm-wide piece. Coat with glue, and cover with glitter.
- Then, cut some slits either side and pop the tree in place. Finally, add an extra sprinkling of glitter to the edges of the tree and your Christmas card design idea for kids is now a reality!
And there you go! These Christmas cards kids can make are bound to steal the show with all their jolly splendour!
Related articles
Fast and easy Christmas craft ideas to decorate your tree
Get into the festive spirit with these amazing Christmas crafts! From loo roll Santa to a glitzy Christmas tree, find something your kids will love here.

2 fun ideas for wrapping Christmas gifts
Learn how to make a Christmas gift box with our two original designs. Discover Christmas wrapping tips that will get you feeling creative this Christmas.
How to Make a Magic Village Advent Calendar for Kids
Looking for ways to have fun with your kids while teaching them how to recycle? Click here to learn how to make musical instruments from waste material.
2 Creative Kids' Birthday Decoration Ideas
Learn how to make homemade party decorations with bunting and piñata DIY birthday decoration tutorials. Click here for these party decoration ideas for kids.

2 Easy Easter Crafts for Kids
Want to know how to fold a paper napkin? Look no further. Folding paper napkins is easy, even for kids, with our guides to folding paper napkin lotuses and cutlery cones.
DIY birthday gift ideas: How to make a birthday box
Gift boxes are as much fun to make as they are to receive! Discover how to make a fun birthday party gift idea into something you’ll both love, here.
